Temperature and humidity have a dramatic impact on the way your guitar plays. All instrument woods expand and contract with seasonal fluctuations in temperature and humidity, and naturally, string height and playing action are affected.
Depending on the climate where you live, your instrument may need routine adjustments a few times a year.
Most guitars have several points of adjustment which are there to control the effects of these environmental changes, and more importantly, these features allow you to tailor the action of the instrument to our own personal playing style.
Note: The following factory specifications are minimum specs, and are meant only to guide you. They should not be taken as hard and fast rules. If you want your action higher, set it higher!
Truss Rod Adjustment
String tension exerts a tremendous bending force on the neck of a guitar. The adjustable steel rod in the neck employs a counter-force to the pull of the strings. If these two opposing
forces are not in harmony with each other, the result will be a poorly playing instrument.
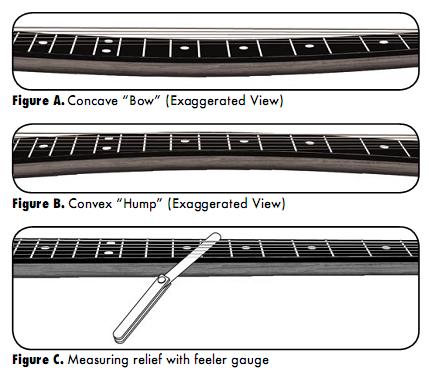
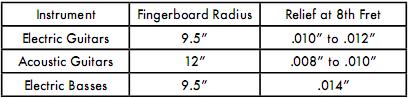
Note: A truss rod that is too loose will result in a concave neck bow and high action (Figure A). A truss rod that is too tight will result
in a convex neck bow and buzzing strings (Figure B).
To check the adjustment of the truss rod, first tune your instrument to pitch. Next, install a capo at the first fret.
For electric guitars and basses, depress the "E" string at the last fret. For acoustic guitars, depress the "E" string at the 14th fret.
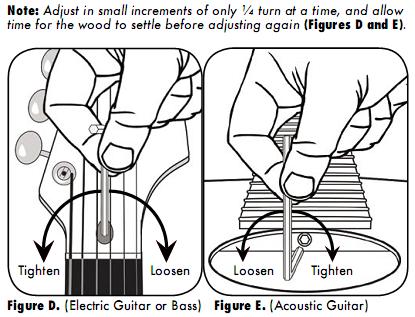
With a feeler gauge, check the gap between the bottom of the strings and the top of the 8th fret (Figure C).
Note: It's a good idea to loosen the strings prior to making any truss rod adjustment. If you don't have feeler gauges, don't give up.
You can approximate the gap, which is about the thickness of a regular business card and a piece of paper put together.
To adjust the truss rod, use the hex wrench supplied with our guitar. If the neck is too concave (Figure A), turn the truss rod nut clock-wise.
If the neck is too convex (Figure B), turn the truss rod nut counter clock-wise. Check your tuning, then re-check the gap with the feeler gauge.
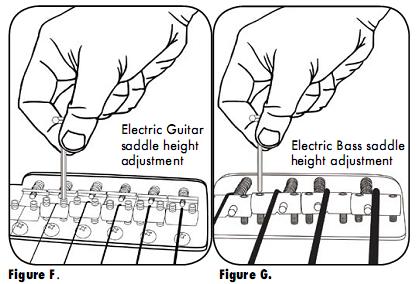
Note: Adjust in small increments of only ¼ turn at a time, and allow time for the wood to settle before adjusting again (Figures D and E).
If you meet excessive resistance, if your neck needs constant adjustment, or you're not comfortable adjusting it yourself,
take your instrument to a reputable luthier or guitar tech.
String Height Adjustment (Action) for Electric Guitars and Basses
First, check your tuning. Next, using your ruler, measure the distance between the bottom of each string and the top of the 17th fret.
Using the appropriate hex wrench, adjust the bridge saddles to height according to the recommendation of the chart below. then re-tune.
Don't be afraid to experiment with the height a little bit, until it feels right (Figures F and G).
If you play with a light touch, you can get away with lower action. If you play hard, you'll need a little higher action to avoid fret buzz and rattles.

If you are not comfortable performing any of these adjustments to your guitar, take it to a reputable guitar tech for a "setup".
Note: Setups and adjustments are considered to be routine maintenance, and as such, are not covered under the manufacturer's warranty.
|
|
|
|